Building a Motion-Controlled Gun for Gaming with MPU6050
Why Build a Physical Gun Controller?
As someone who loves gaming, I spent last night building something I’ve always wanted: a physical gun that actually aims in games based on where I point it in real life. I used a toy Uzi pistol because it had more internal space and gave me room to add various features and components.
The main challenge was figuring out how to communicate to the system where I’m aiming. Several approaches came to mind, but I settled on using the MPU6050 sensor.
Understanding the MPU6050
The MPU6050 is an Accelerometer and Gyroscope module that lets you easily read angle measurements for X, Y, and Z axes through I2C communication. It’s perfect for detecting the orientation and movement of objects in 3D space, which is exactly what I needed for tracking where the gun is pointing.
Mounting the Sensor: Location Matters
I mounted the MPU6050 at the tip of the gun barrel, and this placement is crucial. If you mount the sensor at the back of the gun, you won’t get accurate readings about where the barrel is actually pointing. Think about it: when you rotate the gun slightly at the grip, the tip of the barrel moves much more. This gives us better precision and more accurate aim detection.
The sensor continuously feeds angle data, and I wrote a Python script that translates these angles into relative mouse movements. As the gun moves, the mouse cursor follows accordingly, creating a natural aiming experience.
Adding Immersion with Vibration
To make the experience more realistic, I installed a vibration motor with a weight in the front grip area. Whenever the trigger is pulled, the motor activates and creates a recoil-like vibration. I also added a potentiometer so I could adjust the vibration intensity to my preference. The implementation is straightforward: when the trigger switch makes contact, the motor circuit completes and the vibration kicks in.
Button Layout and Controls
I designed the controller with four buttons, though more could easily be added. The trigger serves as the primary fire button. The hammer has a switch that activates when pulled back. I also included two touch-sensitive buttons for other game actions like making your character crouch or sprint.
Hardware Platform Selection
My original plan was to use a Raspberry Pi Pico with battery power so I could make it completely wireless without any cable connections. Unfortunately, my Pico was broken, so I tried the ESP32 next. However, I ran into some library limitations with the ESP32 that made me switch to Arduino, which worked perfectly for this project. Both platforms are definitely capable of handling this, though.
How the System Works
The architecture is relatively simple for ease of implementation. The Arduino reads the MPU6050 data and button states, then sends this information directly to the host computer through serial communication. A Python script running in the background receives this data and makes decisions about how to respond—moving the mouse based on angle changes and sending keyboard inputs based on button presses.
This approach keeps things straightforward and allows for quick adjustments and testing.
The Sensitivity Problem
One interesting challenge I discovered: the system was extremely sensitive to hand tremors and small movements! Even the slightest shake would move the cursor around. I addressed this both through in-game mouse sensitivity settings and by adjusting the sensitivity calculations in the script. Finding the right balance took some experimentation, but it’s now much more stable while still being responsive to intentional movements.
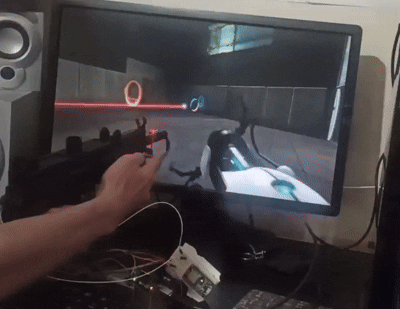
Testing with Portal 2
I chose Portal 2 for testing because it’s a bit different from typical shooters. The game requires at least two fire buttons since you need to shoot both blue and orange portals. My trigger and hammer setup handles this perfectly—one button for each portal type. The precision aiming that the motion controller provides actually makes the puzzle-solving more intuitive and fun.
What’s Missing: Character Movement
One critical feature I haven’t implemented yet is character movement control. Right now, the gun handles aiming and shooting beautifully, but I still need to use the keyboard for moving around. Adding a joystick to control character movement would make this a complete standalone controller. I’m planning to mount an analog thumbstick somewhere on the grip area for WASD-style movement.
Future Improvements
Beyond adding the joystick, making the system wireless would be a major upgrade. Right now, I’m tethered by the USB cable that provides both power and data communication. Switching to battery power and using Bluetooth would give much more freedom of movement while playing.
I could also add more sensors and features—maybe a magazine detection system that knows when you’ve “reloaded,” or multiple vibration motors to create directional haptic feedback. LED indicators could show ammo count or game status. The modular design makes it easy to keep expanding.
Lessons from the Build
The most important lesson was about sensor placement. Mounting the MPU6050 at the barrel tip instead of the base made all the difference in accuracy. I also learned that raw sensor data is incredibly noisy—you can’t just use it directly. Some filtering and smoothing is essential to create a usable control experience.
The vibration feedback, even though it’s simple, adds a surprising amount to the immersion. It’s one of those features that seems minor until you try it, and then you realize how much it enhances the experience.
Final Thoughts
Building a physical gun controller turned out to be more accessible than I initially thought. The MPU6050 makes motion tracking surprisingly straightforward, and the Arduino ecosystem provides everything needed to get it working quickly. While there’s definitely room for improvement—especially adding that joystick for movement—the current version already creates a much more engaging gaming experience than a regular mouse and keyboard.
There’s something incredibly satisfying about physically pointing a gun to aim in a game. It feels more natural and intuitive than moving a mouse on a desk. If you’re into both gaming and electronics projects, I highly recommend trying something like this. Start simple, test frequently, and add features as you go.